A Data Port Waiver lets you request the removal of isofy authentication from a specific wired (data) port at your site. This is useful for devices such as firewalls, routers, and any other devices that are incompatible with isofy's various security features, like 802.1x. This article explains what a waiver is, where to find it, how to submit one, and what happens after you do.
Important Note: Devices that simply lack a screen for logging to the captive portal, such as printers, IoT devices, or conference room equipment, should not be added to isofy using a data port waiver. Those devices can simply be added by MAC address in the isofy Portal, without disabling isofy's security features. Data port waivers are specifically for devices that are incompatible with isofy's security features.
In this article
- What is a Data Port Waiver?
- Where to find Data Port Waivers
- How to submit a request
- What you are agreeing to
- Understanding waiver statuses
- Tracking your request and good to know
What is a Data Port Waiver?
Normally, isofy secures every wired port on your network so that only authenticated devices can connect. A Data Port Waiver is a documented request to lift that security on one specific wall port, so a device can connect directly without device level authentication.
Some devices are incompatible with isofy's various security features, like 802.1x. When you need to connect one of these devices over a wired connection, you submit a waiver that acknowledges the security trade-off and asks isofy to open the port.
Important trade-off: once a waiver is applied, anyone who plugs into that port over a hardwired connection can reach your network without authenticating. Only request a waiver for ports you control and trust.
Where to find Data Port Waivers
You can submit and review waivers from two places in the dashboard. Both use the same Data Port Waivers card.
Equipment page (Settings, then Equipment)
Go to Settings, then Equipment. The Data Port Waivers card here lists waivers across all of your networks, so the table includes a Network column. Click + New to start a request, then choose the relevant network from a dropdown.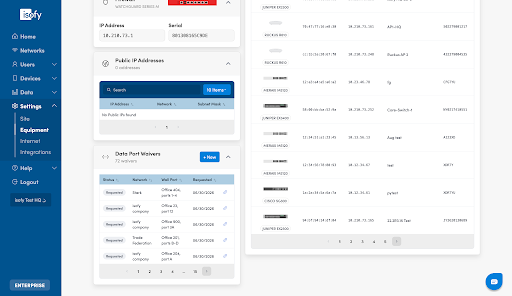
Network Overview tab
Open a network and use the Data Port Waivers card on the Overview tab. This view is scoped to that one network, so there is no Network column and the network is filled in for you automatically when you submit.
The card subtitle shows how many waivers you have. If you have none yet, the card reads No data port waivers.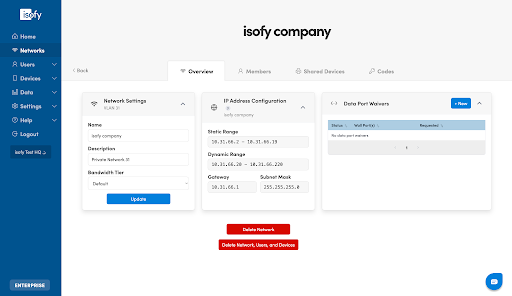
How to submit a request
Submitting a waiver takes about a minute. The steps are the same from either entry point.
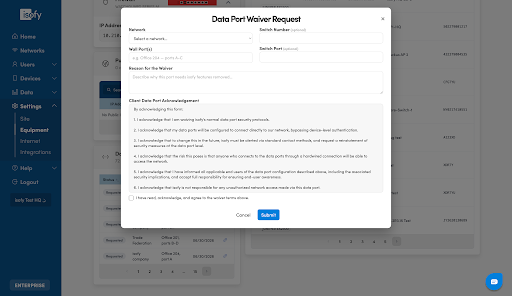
- Click + New on the Data Port Waivers card. The Data Port Waiver Request form opens.
- Complete the form:
- Network (required): on the Equipment page, choose the network from the dropdown. On a network's Overview tab this is already set for you.
- Wall Port(s) (required): the wall port label, for example "Office 204, ports A to C".
- Switch Number (optional): the switch the port connects to, if you know it.
- Switch Port (optional): the port number on that switch, if you know it.
- Reason for the Waiver (required): a short explanation of why the port needs isofy features removed.
- Read the acknowledgement shown in the form, then tick "I have read, acknowledge, and agree to the waiver terms above."
- Click Submit. Your waiver is created with the status Requested and sent to isofy for review.
You can reopen the exact text you agreed to at any time. In the Data Port Waivers card, click the link icon at the end of the row to view the saved document, including who signed it, the network, and the date.
What you are agreeing to
When you submit a waiver, the exact wording you agree to is saved onto your waiver record. If isofy updates the waiver template later, your saved waiver does not change. It always reflects what you actually agreed to.
The current acknowledgement reads:
Client Data Port Acknowledgement
By signing this form:
- I acknowledge that I am waiving isofy's normal data port security protocols.
- I acknowledge that my data ports will be configured to connect directly to our network, bypassing device-level authentication.
- I acknowledge that to change this in the future, isofy must be alerted via standard contact methods, and request a reinstatement of security measures at the data port level.
- I acknowledge that the risk this poses is that anyone who connects to the data ports through a hardwired connection will be able to access the network.
- I acknowledge that I have informed all applicable end users of the data port configuration described above, including the associated security implications, and accept full responsibility for ensuring end-user awareness.
- I acknowledge that isofy is not responsible for any unauthorized network access made via this data port.
Understanding waiver statuses
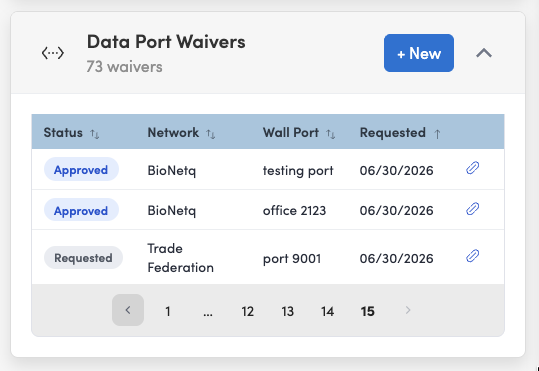
Each waiver shows its current status as a color coded pill in the card. Here is what each status means:
- Requested: you have submitted the waiver and it is waiting for isofy to review.
- Approved: isofy has approved the request. An internal work order is created and the physical port change is queued.
- Applied: the port has been reconfigured and isofy's security has been removed from it.
- Reverted: isofy has reinstated security on the port.
- Cancelled: the request was cancelled before it was applied.
Tracking your request and good to know
- Track progress: you can follow the progress of your request on the Setting - Equipment page.
- Who does what: you submit waivers. isofy reviews, approves, applies, and reverts them. To cancel a request that is still pending, contact isofy support.
- Records are permanent: waivers cannot be deleted. They are kept as a permanent record, and the terms you agreed to are preserved exactly.
- Deleting a network: a network that has active waivers (approved or applied) cannot be deleted. The delete button is disabled and shows how many active waivers remain. Cancel or revert those waivers first.
Was this article helpful?
That’s Great!
Thank you for your feedback
Sorry! We couldn't be helpful
Thank you for your feedback
Feedback sent
We appreciate your effort and will try to fix the article